Are your holiday snaps by-the-sea often disappointing? Beach images can seem repetitive, with little more than the water's edge and shore, or people on the beach. With a change of focus, your beach photos can be turned into unique and original images. This article highlights the most important steps to follow when taking seaside photographs.
Take a look at your surroundings and look for a focal point. While the seaside as a whole is beautiful to the naked eye when you're actually on the beach, it is less interesting as a photograph because the viewer sees only a wide, open space featuring blue sky, blue sea, and yellow sand - a fairly predictable scene. To provide something on which the eye immediately comes to rest within a photograph, find a "focal point" - this is the art of focusing on something out of the ordinary to bring the beach shot to life:
Take a look at your surroundings and look for a focal point. While the seaside as a whole is beautiful to the naked eye when you're actually on the beach, it is less interesting as a photograph because the viewer sees only a wide, open space featuring blue sky, blue sea, and yellow sand - a fairly predictable scene. To provide something on which the eye immediately comes to rest within a photograph, find a "focal point" - this is the art of focusing on something out of the ordinary to bring the beach shot to life:
Avoid putting the horizon in the center
Centering the horizon can give the viewer a sensation that the photo has been sliced in half, which can be disorienting, as long, unbroken horizons contain little of interest in a photo. Instead, break down the image into thirds (the "rule of thirds"), both horizontally and vertically, to create nine equal parts to your image. Keep the horizon square to the framing of your shot, in order to avoid a sloping effect.
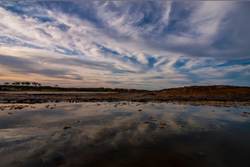
hen imagining the division of the image, focus on where the lines intersect - according to this classical rule of composition, these intersections create the optimum positions for the main subjects of your image.[1]
Centering the horizon can give the viewer a sensation that the photo has been sliced in half, which can be disorienting, as long, unbroken horizons contain little of interest in a photo. Instead, break down the image into thirds (the "rule of thirds"), both horizontally and vertically, to create nine equal parts to your image. Keep the horizon square to the framing of your shot, in order to avoid a sloping effect.
hen imagining the division of the image, focus on where the lines intersect - according to this classical rule of composition, these intersections create the optimum positions for the main subjects of your image.[1]
Frame your picture
Look around you. Ask yourself what points of interest you can include in the photo. For example, are there any rocks, trees, beach houses, piers, etc., that you can use to add a natural frame to the picture? If so, use them. For example, framing a sea shot through trees can be particularly effective if you have a focal point out at sea, such as a boat.
Look around you. Ask yourself what points of interest you can include in the photo. For example, are there any rocks, trees, beach houses, piers, etc., that you can use to add a natural frame to the picture? If so, use them. For example, framing a sea shot through trees can be particularly effective if you have a focal point out at sea, such as a boat.

Don't just shoot straight on, mix the angles up a bit. Aim for something kooky, funky and interesting. Get down low to photograph children and their beach activities, stand up high to take a tree, or lie down under a pier.
Blue, more blue, perhaps some yellow: beaches aren't the most imaginative places color-wise. This makes it important to capitalize on any splashes of color. Vibrant colors will really stand out, and make your photo look doubly attractive.
Blue, more blue, perhaps some yellow: beaches aren't the most imaginative places color-wise. This makes it important to capitalize on any splashes of color. Vibrant colors will really stand out, and make your photo look doubly attractive.
Make the most of non-sunny days
When the sun's riding high it might be a nice time for sunbathing, but it's the worst time of day for decent photos as the light is too strong and bright. The best times of day for beach photos are at the beginning and end of the day, especially around sunrise and sunset. The sun resting on the horizon looks brilliant, and it's hard not to take a decent snap at these times. As an added bonus, you will have less people on the beach at these times of day.
When the sun's riding high it might be a nice time for sunbathing, but it's the worst time of day for decent photos as the light is too strong and bright. The best times of day for beach photos are at the beginning and end of the day, especially around sunrise and sunset. The sun resting on the horizon looks brilliant, and it's hard not to take a decent snap at these times. As an added bonus, you will have less people on the beach at these times of day.
- Morning air is usually still and the light is quiet, delicate and diffuse until the sun rises. Early morning light changes rapidly with the sun rising, so expect your exposure times to change rapidly and to move quickly to capture the special moments.
- Evening light often has a warm glow that provides intense gold and rose colours. Haze and shadows are common features that you can draw on as the day draws to an end.
- Take care not to include your own shadow when taking photographs early and late in the day when the sun's shadows are at their longest; check around the whole frame to make sure you're not forming a part of the picture! You can easily rectify this by moving to a different position.
Find the best ways to take portrait photographs
Photos of people on the seaside can be the stuff of nightmares – on a sunny day, it is all too easy for people to appear washed out and squinting. You have several options to ensure a good photo of people at the beach:
Photos of people on the seaside can be the stuff of nightmares – on a sunny day, it is all too easy for people to appear washed out and squinting. You have several options to ensure a good photo of people at the beach:
- Wait for cloud cover to soften the light over their faces.
- If there is no sign of cloud, use other cover, such as trees or umbrellas.
- Have your subjects turn away from the sun and use spot metering to focus on their faces. This will allow you to expose their faces well while the image around the person will be over-exposed. You can use a photo program to put the entire image into better shape later. [3]
- Use the flash. Forcing the flash can take care of shadows caused by clothing, caps, sunglasses, etc., and will help to improve the exposure of the person. You might need to experiment with the level of flash, however, if relevant.
- Consider using bracket exposures if you want to be sure of getting one really good shot. This means taking several pictures, one at the usual exposure and then others a stop more or less exposure than indicated by the meter.[4]
- Try photos from behind. Try photos from behind. They can be effective provided there is enough interest in the entire scene.
Commercial and Industrial Cameras
There are many online e-stores that offer camera products at discounted priced. Be careful that you choose a merchant or camera product that is suitable for hobby style photography. Industrial camera suppliers provide provide product intended for machine vision systems and are most likely not suitable for hobby photography. Even though brands such as Hitachi, Sony, Tucsen, Fuji, SenTech or CoStar may sound familiar, they are in fact selling Industrial camera products, or perhaps microscope cameras, and not photography products.
There are many online e-stores that offer camera products at discounted priced. Be careful that you choose a merchant or camera product that is suitable for hobby style photography. Industrial camera suppliers provide provide product intended for machine vision systems and are most likely not suitable for hobby photography. Even though brands such as Hitachi, Sony, Tucsen, Fuji, SenTech or CoStar may sound familiar, they are in fact selling Industrial camera products, or perhaps microscope cameras, and not photography products.
 RSS Feed